Showing posts with label my cooking. Show all posts

Monday, May 4, 2015

Recipe | Lemon Puffy Cookies

Comments
I find baking cakes intimidating, so I usually go for cupcakes and other pastries. Lately, I am on a cookie craze, and one of the first cookie recipes I tried was the Lemon Puffy Cookies, which I first watched thru Kawaiisweetworld's page on YouTube.


Quite easy to make, right?

Ingredients:
  • 1 cup (2 sticks) butter
  • 3 cups granulated sugar
  • 1 tsp vanilla
  • 2 eggs
  • 2 tsp lemon zest (zest of about 2 lemons)
  • 4 T. lemon juice (about 1 1/2 lemons)
  • 1/2 tsp salt
  • 1/2 tsp baking powder
  • 1/4 tsp baking soda
  • 3 cups flour
  • 3/4 cup powdered sugar to roll cookies before baking

Directions:
  • Preheat oven to 350 F
  • Cream together butter and granulated sugar until light and fluffy in large bowl
  • Add in vanilla, eggs, lemon zest, lemon juice and mix until combined.
  • Mix in salt, baking powder, baking soda, and flour until just combined.
  • Roll heaping tablespoons of dough in powdered sugar until coated. Place on parchment paper/Silpat lined baking sheet 3 inches apart and bake for 9-11 minutes.
  • Cool on wire rack before serving.

color match! dig in!

As what was said on the video tutorial, one can easily half the ingredients, so that was what I did, after all, this was just the first time for me to try the recipe. Our oven is small, so I was only able to make about 12 cookies per batch, using a tablespoon to scoop out cookie dough so the cookies will be uniform. The very first batch was the most pleasant looking as they are pale yellow in color. The second batch had a little brownish color on the outer part of the cookies.

The way I see it, if you wanna try to bake this, take out the cookies as soon as the time is up because the longer you leave the cookies inside, the more tough they will become. The brownish / toasty part will also contribute a different taste, so it is best to take the cookies out while they were still pale yellow in color and let the residual heat cook them thoroughly.

I love the taste of these cookies! It reminded me of the Lemon Revel Bars my sister baked before, sans the lemon curd. It was like eating soft yet chewy pie crust with a subtle hint of lemon. It was tarty, but not so much... it was sweet, but not so much either.  I will definitely bake this again.

*** Jenn ***


Friday, November 22, 2013

Recipe | Banana PB&J Cupcakes

Comments
When I posted about the Whole Wheat Carrot Cake Cupcakes, I mentioned that I wanted to bake Banana PB&J Cupcakes next time. This has been something I wanted to do because we all know bananas go well with peanut butter and peanut butter goes well with jelly. When my sister and I once visited a pastry shop, they were selling this kind of cupcakes, and we tried it to give us an idea of how it will taste like once we create it at home. It was delicious, but there were things about it that we didn't like so we decided to tweak it. For this recipe, I once again used Maya Oven Toaster Cake Mix, because even if wanted to do something from scratch, we fear our oven toaster might not bake it good.

Time to Bake

Banana PB&J Cupcakes
{yield - 12 cupcakes}

Ingredients - Banana Cake

  • 1 box (3.11 oz) Maya Oven Toaster Cake Mix - Banana Cake
  • 1 medium egg
  • 2 to 3 pieces of bananas, mashed
  • 3 tablespoons vegetable oil
  • 4 tablespoons water
Ingredients - Peanut Butter Frosting
  • 1 stick butter (1/2 cup), softened
  • 1lb. powdered sugar
  • 1/2 cup peanut butter (creamy)
  • 1 tablespoon vanilla extract
  • milk (optional, on stand by)
Other Ingredients
  • Fruit Jelly
  • Chocolate Bar Pieces
Let's bake!


Banana Cupcakes

Start with the cupcakes.

> Preheat your oven toaster.

> In a bowl, combine egg, water, and oil then whisk lightly. Add mashed bananas and mix.

> Sift the banana cake mix and combine with the wet ingredients. Mix or beat until well combined, without over mixing or beating it.

> Line your muffin pan with paper cups and pour batter until 2/3 full. Tap the pan once. Cover the pan with aluminum foil, without letting the foil touch the pan as the batter might stick to it while baking.

> Pop in the oven toaster and bake for 7 and a half minutes. Take the foil out and continue baking for 2 and a half minutes, or until the surface is brown and the toothpick comes clean when you poke it.

> Line cupcakes on cooling rack.

While the cakes are cooling, time to make the frosting.

Peanut Butter Frosting

> Cream softened butter and peanut butter until it turns light in color.

> Add powdered sugar slowly and beat for a while then add the vanilla extract. Continue beating until it becomes fluffy and light.

> If the frosting was too dense, add milk (1 tablespoon at a time). If it's too watery, add powdered sugar until you get the consistency you like.

> Place in a piping bag.

Once the cupcakes are cool enough, start piping the frosting. This frosting is a little on the rich side, so even if you love peanut butter, please don't over frost as the peanut butter flavor might over power the banana cake. There has to be a balance of all flavors.

Finally top it with fruit jelly.

Banana PB&J Cupcakes

I let my sister bake the cakes this time, but I did guide her with the aluminum foil and when to take it out (I made the frosting). Making 12 cupcakes, it meant us three girls have 4 cupcakes each, so the day we made this recipe, we only allowed ourselves to eat 2 cupcakes and I topped it with strawberry jam and pieces of Krackel chocolate.

Going back to the pastry shop visit we did, they presented their Banana PB&J Cupcakes by spreading peanut butter on the surface of the cake before piping the frosting, creating a well in the middle where they placed the fruit jelly. We found the strawberry jelly a little too tangy for our taste, so for these cupcakes, I decided to just drop a little strawberry jelly - just to provide flavor. It was tangy, but the peanut butter and Krackel chocolate balanced it all.

Banana PB&J Cupcakes

At home we have two jars of fruit jelly - strawberry preserves (the syrupy kind) and orange marmalade (from Good Shepherd). Whenever I make my own peanut butter and jelly sandwich, I always go for the orange marmalade because I loved to chew on the orange rinds. Seeing the bottle in the fridge made me go for it for our next set of cupcakes.

We all agreed that the one with orange marmalade tasted better.

With these cupcakes, as well as the whole wheat carrot ones, we are very sure that we won't be buying cakes this Christmas anymore, we will just bake it at the comforts of our own home.

Hmmm... what if I add oatmeal to this next time? :)


Friday, November 15, 2013

Imbento Istapegi

Comments
My blog wasn't updated regularly since last Friday because I am actually struggling if it's "right" for me to post about food - when I know thousands of my countrymen were in dire need of food and water after super typhoon Yolanda (international name Haiyan) hit the country, causing massive destruction on all the provinces along its path.

Still, I feel the need to update this blog, so for today let me just share something that is not really insensitive.

- * - * - * - * - * - * - * - * - * - * -

Have you ever felt those moments when you can't think of anything to cook? We do feel that every now and then, and last week... while thinking of what to eat, we just had the sudden cravings for spaghetti. Knowing we have spaghetti noodles, hotdogs, and ground pork, I decided to cook spaghetti for brunch, but I was faced with a little setback when I realized we already ran out of spaghetti sauce.

Like what they say, "necessity is the product of all inventions," and using what we have in the fridge, I came up with this dish.


Obviously, I started cooking the spaghetti. We all know spaghetti noodles take a lot of time, so to save time and fuel, we at home boil the noodles until halfway through then cover the pot and let the residual heat cook it. Of course, this meant checking on the noodles few times to make sure it doesn't overcook. If we are to eat it right away, I drain the water once it's al dente... but if we are to serve it to guests and dining time is uncertain, we drain it just before it's cooked, so the heat remaining would further cook it. Quite a tricky thing to do, but we've mastered it already. Also, we don't run cooked spaghetti under water after cooking because it washes out the starch on the surface of the noodles.

Anyway, while waiting for the residual heat to cook the noodles, I sauteed finely chopped onions and garlic on lite butter, before adding ground pork. I sauteed all together until the meat turns opaque and season it with salt and ground pepper. I then added the hotdogs, tomato sauce, sour cream, and a spurt of McCormick bread spread (herb and parmesan) to add more flavors. Simmered it until pork was cooked and mixed it with the spaghetti noodles, and topped it with grated cheese before serving.

This was the first time I used sour cream with our spaghetti sauce. It provided an interesting twist, which blended well with the bread spread. For an uncertain dish, this turned out to be okay, and since I didn't receive any violent reactions from mom and sis, I knew I did well with this dish.

Thank heavens for creativity.

FTFBadge

Friday, November 8, 2013

Recipe | Whole Wheat Carrot Cupcakes with Sour Cream Frosting

Comments
I have cooked several cakes using the steamer - Banana Cake, Banana Cupcakes, Sweet Corn Puto-Muffins, and Bibingka, all using different Maya Cake Mixes. When I attempted to create pancakes using the Butter Cake Mix, I didn't get the result I wanted, but instead of throwing the batter away, I decided to line the muffin pan with aluminum foil and bake it using the Oven Toaster, just to give me an idea how it would be - making this my guinea pig, my sacrifice batter.
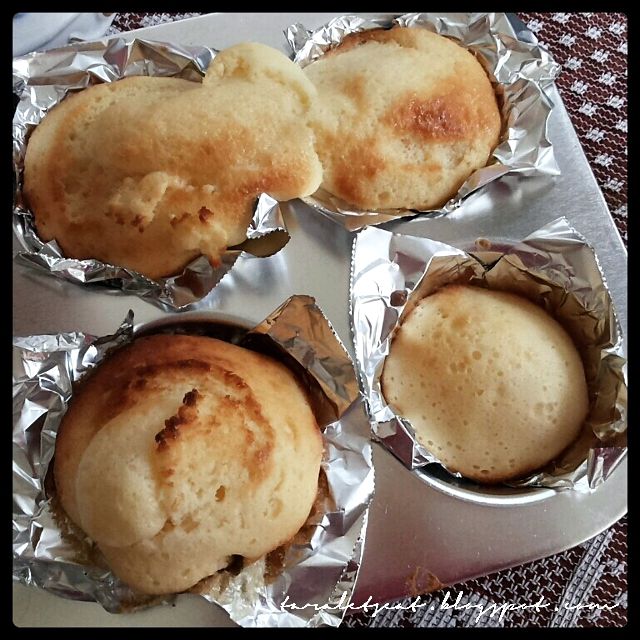

It wasn't a successful experience, but not a failure either. When I use the steamer, I fill the cups with the batter, which was what I did here, and as you can see it overflowed. The bottom right one I only filled halfway, and it turned out to be okay. The taste was good, and this moment, we knew we prefer the taste of cakes baked using the oven toaster compared to the ones cooked using a steamer. Baking the Rocky Road Brownies may be another not-so-successful experience... but I am very much willing to try and try until I get it right.

We still have several boxes of Maya Cake Mixes at home - three of which were boxes of Whole Wheat Carrot Cake Mix, so last weekend, I decided bake some cupcakes for us three girls. I decided to go with Sour Cream Frosting for no special reason... it just came out of my mind that I wanted to go with sour cream for the frosting.

Whole Wheat Carrot Cupcakes 
with Sour Cream Frosting
{yield - 12 cupcakes}

Ingredients (Carrot Cupcakes)
  • One box (230g) Maya Whole Wheat Carrot Cake Mix
  • 3 tablespoons vegetable oil
  • 4 tablespoons water
  • 1 medium egg
  • 1 cup grated carrots (loosely packed), approximately 100g.
Ingredients (Sour Cream Frosting)
  • 1 stick butter (1/2 cup) softened
  • 3/4 cup sour cream
  • 3/4 teaspoon lemon juice
  • 4 to 4 1/2 cups confectioner's sugar, sifted
  • 1 tablespoon vanilla extract
Let's start baking!


Whole Wheat Carrot Cupcake Batter

> Preheat your oven toaster. Our oven toaster is the most basic kind - it only has a timer and not the kind that you can set the temperature. I just set it to its longest time, 15 minutes.

> Combine all ingredients for the cupcakes. Mix until there are no lumps, but be sure not to over mix or over beat it.

> Line your muffin pan with paper cups or if you don't have paper cups, brush the pan lightly with butter.

> Pour batter into the cups, leaving 1/3 space. You can also use an ice cream scooper or a measuring cup to make sure the amount you put in the cups would be uniform.

> Cover the pan loosely with aluminum foil, careful not to touch the surface of the pan to allow the batter to rise.

> Pop in the oven toaster and bake for 10 minutes.

> Cool each cupcakes for a few minutes before frosting.

Whole Wheat Carrot Cupcakes

Our oven toaster is small and it can only accommodate a cupcake pan with 6 slots, meaning I baked two batches of cupcakes. This is still a trial and error stage for me, so I experimented a little. For the first batch, I let it bake covered for 5 minutes, and baked it uncovered for another 5 minutes. It produced this kind of cupcakes - slightly toasted at the sides, but with a pretty dome shape at the center. The second batch, I baked covered for 7 minutes, and baked it uncovered for 3 minutes. It produced a batch of pointy shaped cupcakes, kinda like a mountain. The inside was also still moist even after 10 minutes, so I cooked it for 3 minutes more. Next time, I will just go with what I did with the first batch, but will add more batter into the cup.

Next, the frosting.


> In a mixing bowl, beat butter and gradually add sugar. Beat until well incorporated.

> Add vanilla, lemon juice, and milk, and continue beating until fluffy. If it's too dense, add milk (one tablespoon at a time). If it's too liquidy, add more sugar.

> Refrigerate for about 30 minutes before spreading or piping it on top of the cupcakes.

Whole Wheat Carrot Cupcake

I don't know what the heck I was thinking that I could make a good frosting without the help of an electric mixer. I thought I could make it with just a hand held whisk, beating as fast as I could. It only melted the sugar and even if I used our blender, it still didn't look good. As is, it tasted good, because it had a nice balance of tang and sweetness, and was a good pair for the carrot cupcakes.

We were kind of prepared to just spread a little frosting on top of our cupcakes before eating it, but the next day, we were lucky to find an electric mixer at the mall sold for 50% off, and bought it just to complete this trial and error stage of our baking life.

Whole Wheat Carrot Cupcakes

The sugar has already melted and the butter wasn't creamed at the start of the process, so even if the electric mixer did wonders to the frosting, it still didn't look the way I hoped my frosting to look like.

Whole Wheat Carrot Cupcake

Still, I could say this was 90% successful. Now that I tried different things, the next batch of cupcakes would definitely be much better.

Now, I am trying to locate a shop to buy disposable piping bags because the cake decorator I bought was a little small and quite difficult to work with. I need to learn how to pipe awesome frosting, so by Christmastime, we don't have to buy cakes at the bakeshop, we will just bake it.

I do love the cake mixes of Maya. Each and every product we tried tasted good, and as a person who's just trying to learn the ropes of baking, using the mix helps a lot. Of course in time I also would like to bake cupcakes "from scratch," but for now, I am quite satisfied with this. Even without the frosting it tasted great as it had the goodness of the cinnamon that goes well with carrots, and I am sure you will like it, too.

Next time, I will bake Banana PB&J cupcakes. :)

FTFBadge

Friday, November 1, 2013

Recipe | Fish Cakes Salad

Comments
There are so many ways to create your own salad, but I still haven't explored about it yet, so whenever I make my salad at home, I usually stay with the typical ingredients - lettuce, cucumbers, carrots, and sometimes, tomatoes. Even if I go for these ingredients time after time, I do try to mix and match, so I won't get tired eating the same ingredients over and over again.

My mom cooked some Paksiw na Galunggong for lunch and this I used to create this salad for my dinner that day.

Fish Cake Salad

Fish Cakes Salad
{serves 1}

Ingredients - Fish Cakes

  • Leftover fish from Paksiw na Galunggong - bones removed, meat flaked
  • Finely minced garlic and onion
  • Finely minced chili fingers (optional)
  • Flour and/or Cornstarch
  • Panko Breadcrumbs (optional)
  • Paksiw sauce (as needed)
  • salt and pepper (to taste)
  • Oil for frying
How to Cook - Fish Cakes
  • Mix all ingredients except for the oil. 
  • Using a melon baller or a measuring spoon, scoop out mixture, roll it with the palms then flat it. Do this until all the mixture has been prepared into little patties.
  • Heat oil and fry the patties until brown. Drain on paper towels, and set aside.
Ingredients - Salad
  • Lettuce of your choice (I used a combination of romaine and lollo rosso)
  • Carrots, julienned
  • Cucumber, diced
  • Tomatoes, diced 
  • Green bell pepper, sliced thinly
  • Red Onion, sliced paper thin
  • Pomelo
  • Store bought Thousand Island Dressing, mixed with ground pepper
How to Assemble - Salad
  • Layer your salad ingredients in your choice of plate or bowl
  • Top with the fish cakes
  • Drizzle with dressing.

Fish Cake Salad

Things to know:
> If you don't have leftover fish paksiw, you can use any kind of fish you like - just cook it in water with your choice of seasonings (salt, pepper... with onions, garlic, and bay leaf if you like) then flake it. Or, you can just boil / steam the fish then flake it.
> If you want to go with the Paksiw, cook the fish with vinegar, salt, pepper, chili fingers, onion, garlic, and ginger. Set it aside for a few hours so the vinegar sauce would penetrate the fish meat.
> To bind the mixture, I used the vinegar sauce from the paksiw, but you can also use 1 egg as your binder. I decided not to go with the egg to lessen the calorie content of my meal.
> You can pan fry the patties or use a pan grill. The choice is up to you. Since the fish was pre-cooked, all that was needed was to crust the outer parts of the patty for added texture.

This salad tasted like sandwich minus the bread. The pomelo provided more tang into the dish, and now I can say that I love, love, love having fruit on my salad. This is one versatile dish and you can go with different choices. You can also go with your choice of dressing - the Mango Vinaigrette went well with this, too.


FTFBadge
Related Posts Plugin for WordPress, Blogger...

Jenn, the Foodie


I come from a family who loves cooking and eating. I never had any formal training in cooking and that I taught myself how to cook based on the handed down recipes, but I could say that I can cook good food. In 2008, I started documenting my food trips for my travel blog, and since I have quite enough to start a food blog, might as well put all those food trips in one location. Thus, a food blog is born - thanks to the new Friendster Blogs. However, due to several problems, I was left with no choice but to pack bags again and move here instead. Here's the permanent address, promise! Enough talk, let the food trippin' begin! {Know More About Me}